Hermes
תוכן זה אינו זמין עדיין בשפה שלך.
For Hermes, the cleanest path is the hosted ClawHub skill. It keeps setup agent-native while using the same underlying Agent Analytics CLI and API surface as the other install paths.
The important detail: Hermes should use the official pinned CLI through npx --yes @agent-analytics/[email protected] .... The skill gives Hermes the right workflow and guardrails around that CLI.
Prerequisites
Section titled “Prerequisites”- Hermes installed and working in the environment where you want Agent Analytics
npxavailable in that runtime- Access to the Google or GitHub sign-in you want to connect when Hermes sends the approval link
Recommended: ask Hermes to install it for you
Section titled “Recommended: ask Hermes to install it for you”The easiest path is to tell the user: here, copy this prompt and ask Hermes to install the skill.
Install the Agent Analytics skill for me from ClawHub. Use `clawhub/agent-analytics`, install the regular Agent Analytics skill, and tell me when it is ready to use.The hosted listing is here:
If someone wants the direct command instead, use the source-qualified form:
hermes skills install clawhub/agent-analyticsThat is more reliable than the short name alone.
Once installed, Hermes can create projects, confirm initial goals, generate tracking snippets, add intentional events, query stats, inspect funnels, and manage experiments from the same conversation loop.
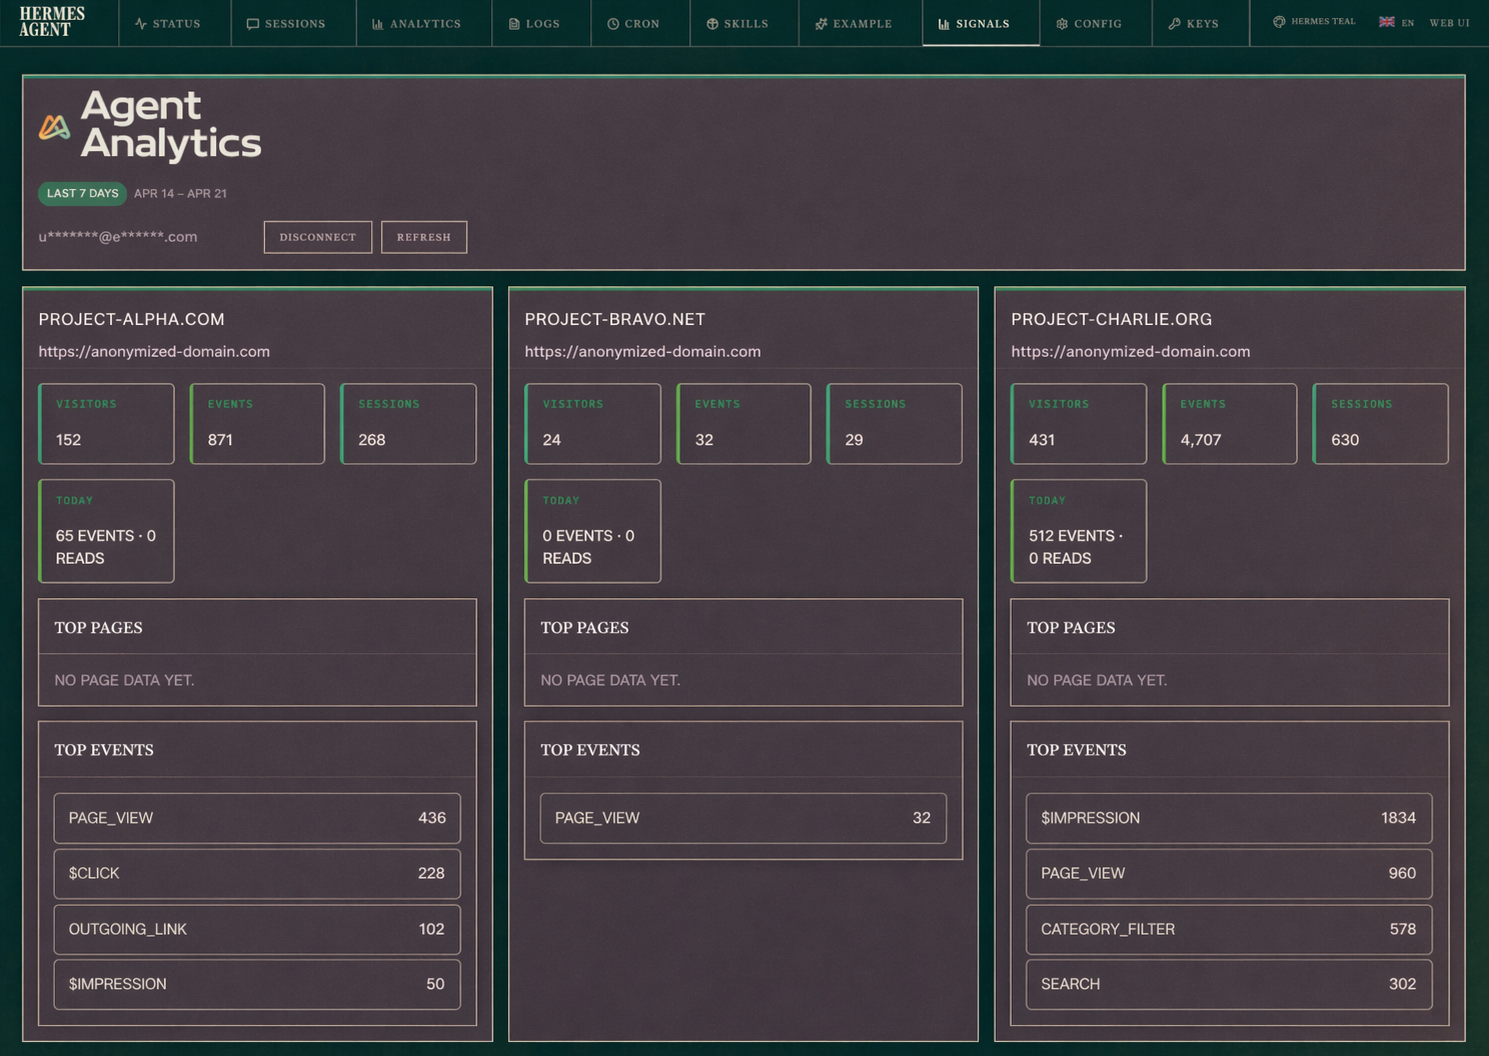
Optional: add the Hermes dashboard plugin (Signals tab)
Section titled “Optional: add the Hermes dashboard plugin (Signals tab)”If you also want a native read-only dashboard inside Hermes Web UI, use this prompt:
Install the Agent Analytics Hermes dashboard plugin from GitHub. Clone https://github.com/Agent-Analytics/agent-analytics-hermes-plugin into ~/dev/agent-analytics-hermes-plugin (or update it if it already exists), symlink it to ~/.hermes/plugins/agent-analytics, build it, restart Hermes dashboard, and verify the Signals tab loads.Plugin repo:
Optional: use an Agent Analytics Hermes skin
Section titled “Optional: use an Agent Analytics Hermes skin”If you want the Hermes CLI itself to match the Agent Analytics palette, the easiest path is to tell the user: here, copy this prompt and ask Hermes to install the skin.
Install the Agent Analytics Hermes skin for me. Download https://docs.agentanalytics.sh/downloads/agent-analytics-hermes-skin.yaml into ~/.hermes/skins/agent-analytics.yaml, switch my current skin to agent-analytics, and tell me when it is active.If someone wants the manual path instead, install the custom skin YAML built from the shared UI colors:
mkdir -p ~/.hermes/skinscurl -fsSL https://docs.agentanalytics.sh/downloads/agent-analytics-hermes-skin.yaml -o ~/.hermes/skins/agent-analytics.yamlThen activate it in Hermes:
/skin agent-analyticsOr make it your default in ~/.hermes/config.yaml:
display: skin: agent-analytics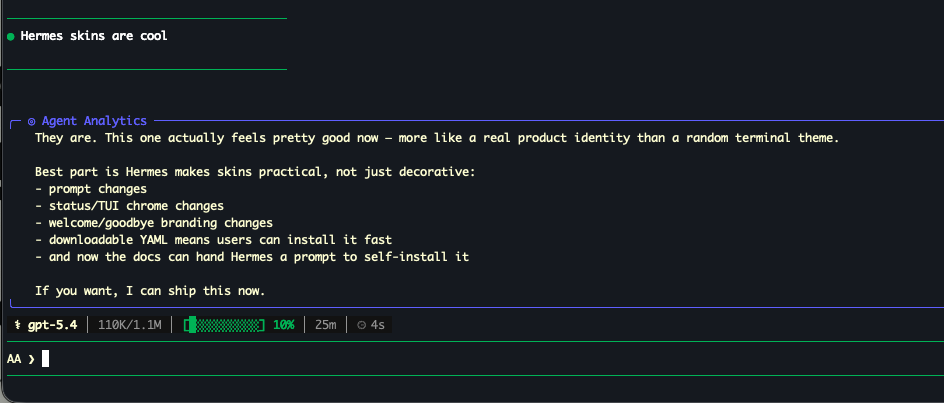
The skin uses the core Agent Analytics screenshot palette:
- primary green:
#0f9f5b - warm accent:
#f06a19 - dark base:
#111412 - raised dark surface:
#171b18 - light text:
#f3efe4 - muted text:
#8d958d
This version intentionally avoids blue accents so it matches the live Hermes skin look more closely.
If you want to tweak it, start from the downloadable YAML:
The Hermes skin system itself is documented here:
The public skill repo also includes agent-analytics-autoresearch, which is the growth-loop skill for producing experiment candidates from analytics data. Use the regular Agent Analytics skill for setup and reporting; use the autoresearch skill when you want the loop to generate, critique, judge, and rerun variants from measured evidence.
Verify the CLI path
Section titled “Verify the CLI path”Run:
This confirms that the pinned CLI path works in the Hermes runtime before you start login or project setup.
Start login with detached approval
Section titled “Start login with detached approval”The normal Hermes path is detached browser approval:
That command prints:
- an approval URL
- a follow-up
login --auth-request ... --exchange-code ...command
Use detached login when Hermes is running remotely, in a managed runtime, or in any workflow where the agent should hand you a browser approval link and then continue after your reply.
Important: goal-first instrumentation
Section titled “Important: goal-first instrumentation”In Hermes and other CLI runtimes, prefer the skill-led setup workflow over scanner-first setup. The agent should create or identify the matching project, ask you to confirm the initial product goal before storing durable context, inspect the repo or workflow context, and install only the first useful events tied to that goal.
The public website-analysis preview can still help when you only have a public URL or want a scanner-informed sales/setup preview, but it is not the normal Hermes setup path.
First setup flow in Hermes
Section titled “First setup flow in Hermes”Use this order:
npx --yes @agent-analytics/[email protected] events my-site --event <first_useful_event> --days 7 --limit 20That gives Hermes a project, a tracker install target, and a concrete event verification step. The event itself should come from the goal-confirmed setup workflow, not a generic pageview-only install.
The --domain flag is still the correct CLI shape. Use it for the project’s primary setup surface URL or origin, including a temporary local or preview URL when that is the surface you are testing. Add or keep other allowed origins with update --origins when the project also has production, local, staging, or preview surfaces.
Example Hermes prompt
Section titled “Example Hermes prompt”After installing the skill, tell Hermes:
Set up Agent Analytics for this project. If approval is needed, send me the login link and wait. I will sign in with Google or GitHub, then reply with the finish code. After that, create or identify the matching Agent Analytics project, ask me to confirm the initial product goal before storing durable context, inspect the repo and product workflows, install only the first useful events tied to that goal, explain what each event enables, and verify the first useful event.For deeper product analysis, extend it with owned surfaces:
If this product has other owned public websites or pages that shape the growth loop, map those surfaces to the project or portfolio, tell me what data we are not collecting yet, and ask before storing any new durable portfolio goal.Demo mode first if you want a no-login proof
Section titled “Demo mode first if you want a no-login proof”If you want to prove the CLI flow before connecting a real account, run:
npx --yes @agent-analytics/[email protected] --demo funnel agentanalytics-demo --steps "page_view,signup_started,signup"Demo mode is read-only, uses seeded sample data, and does not touch your saved CLI login.
Troubleshooting
Section titled “Troubleshooting”- If
hermes skills install agent-analyticsdoes not resolve correctly, usehermes skills install clawhub/agent-analytics. - If login worked earlier but later says “Not logged in”, run
auth statusand confirm Hermes is using the config directory you expect. - If you intentionally use a compatibility API key for direct HTTP debugging, keep it in the runtime environment rather than pasting it into chat.